
Pocket CTF Student Guide
This is the practical companion to the game. It shows you where to look, how to use the common tools, and how to get unstuck without printing the answers. Use the glossary for unfamiliar web, data, evidence, and cryptography terms.
Each playable profile has six modules. Open one from the Pocket CTF home page, read its task, and use this guide for tool recipes and module links.
Headless boards start in Documentation. On a board with a display, use its buttons to select and confirm Documentation or your assigned game before joining Wi-Fi. In Documentation on any board, choose Choose a track, select your assigned track, and press Start selected track. The board restarts; stay on the same PocketCTF-XXXX Wi-Fi network and reopen http://192.168.4.1/ if needed.
During play, Reference opens the offline lessons without restarting or clearing progress. Use Device home to return to the game. Tool exercises, fundamentals, and module guidance remain available without internet access.
To reselect, follow the game's Switch track link and confirm End game and return to Documentation. This ends the game for everyone on the board and clears all progress. Opening the confirmation page alone does not end the game. A reset or power cycle returns headless boards to Documentation and display boards to their physical menu. These controls are shared; coordinate with your instructor and teammates before switching.
USB remains an optional alternative when mpremote is installed:
mpremote connect PORT exec "from pocket_ctf.selection import set_active; set_active('hard')" + resetReplace hard with easy, medium, insane, glass-witness, river-station, lattice, or docs as needed. The docs option returns to the documentation home page. Find PORT with mpremote devs. The request applies to the next boot only; the following reset restores the board's normal startup. Switching restarts the board and clears in-memory progress.
Quick start
- Follow the connection guide and open the assigned Pocket CTF profile.
- Keep the game open in one normal browser profile. Do not use a private window or delete the
pctf_sessioncookie. - Start with the browser. Use a terminal only when the task mentions headers, methods, hashes, metadata, or an API.
- Copy a revealed flag or seal exactly, including
POCKET{...}and its final suffix. Each flag in the selected track has its own four-character hexadecimal suffix, regenerated when the game starts. Discover flags again after a restart; do not reuse another challenge's suffix. - If you are stuck, read only the first hint for that module. Try it before reading the second hint or revealing an in-game hint.
What you need
| Tool | What you use it for | Alternative |
|---|---|---|
| Modern browser | Pages, source, developer tools, cookies, requests | Any current Firefox-, Chromium-, or WebKit-based browser |
| Text editor | Notes, logs, JSON, copied values | A browser tab for small text files |
curl | Headers, methods, custom headers, forms | Browser Network panel or an instructor-approved HTTP client |
| Python 3 | Decoding, small searches, arithmetic, advanced modules | Another language with the same operations |
file, strings, sha256sum | File type, readable strings, hashes | File-properties or checksum tools |
exiftool, pdfinfo, pdfdetach | Image/PDF metadata and attachments | The offline tool linked by the module |
jq | Read and filter JSON | A text editor or browser JSON viewer |
You do not need every tool for every profile. Easy and most scenario modules can be completed with a browser and a few local file tools. Hard and Insane expect short scripts and more command-line work.
How to use this reference
Start with the tool exercise linked by your module. Run its synthetic example locally and compare your output with the expected result before substituting challenge evidence. A successful command is only the first checkpoint: name the field or bytes it exposed and explain what they establish.
Keep notes with five entries: original request or filename, observation, question, one controlled change, and result. For a file, include the field name or line number. Keep observations separate from inferences: “the author field contains a name” does not prove that person wrote the document.
If stuck, first decide whether the problem is tool syntax, interpretation, missing evidence, or submission format. Use the expected output and error guidance below to fix tool problems before spending a puzzle hint.
Stay inside the exercise
Use these techniques only on the Pocket CTF board assigned to you. Do not scan, flood, or run general guessing scripts against the board. Quiet Oracle and Final Authority explicitly require bounded, sequential tests; follow their module limits. Send one request at a time; it is a small single-threaded device. A module may explicitly permit a small, bounded search on data copied to your computer. Run that search locally, then send only the result to the board.
The commands below use DEVICE_IP, PATH, NAME, and VALUE as placeholders. Replace them only with information shown by your assigned exercise.
Browser basics
Open your browser's menu and find Developer Tools (Chrome/Edge: More tools; Firefox: More tools → Web Developer Tools). The panel names below refer to that window. Firefox calls the DOM panel Inspector; Chrome and Edge call it Elements. Select Network before making a request so it can record the exchange.
Choose a tool path
You do not need to learn every tool before starting. Use one path, then try the alternative to check your understanding. Both paths should expose the same evidence; record any differences rather than assuming the GUI is incomplete.
| Task and example modules | Browser or graphical path | Terminal path |
|---|---|---|
| Source and hidden controls: Source Sleuth, Behind the Button, Covered Name | View Source and Elements/Inspector | Save HTML and search it as text |
| Headers and forms: Header Hunter, Profile Overflow, Trusted Gateway | Network and a request editor | cURL |
| Encodings: Encoded Telemetry, Layered Token, Checksum Crown | Local browser console | Python or Base64/hex CLI |
| Structured records: Weekend Posts, Echo in the Rain, Consent in the Wrong Order | JSON viewer and evidence table | jq or Python |
| Image metadata: Byline Photo, Portrait of Static | Metadata-aware image viewer | ExifTool or supplied PNG script |
| PDF properties/attachments: Pitch PDF, Lawsuit Filing | Desktop PDF properties and attachment panels | pdfinfo, ExifTool, pdfdetach |
| File integrity: Hairline Fracture | File-checksum utility with SHA-256 | sha256sum, Get-FileHash, or Python |
| Chronology: Four Clocks | Paper or spreadsheet | Python datetime |
| Evidence decisions: Safety Decision | Browser and evidence table | JSON viewer |
The sections below explain how to operate each path. Browser-only devices may not have a capable metadata or PDF attachment viewer; ask for the classroom's prepared tool or an instructor-provided text export. A screenshot of a file is not equivalent to that file's metadata or attachments. Insane modules still require local scripting for repeated calculations and controlled requests.
Practice with a local HTML file
Create a folder for practice. In a plain-text editor, save the following as practice.html (not practice.html.txt), then open it in your browser. This exercise only reads and edits your local browser view; it sends no board requests.
<!doctype html>
<title>Tool practice</title>
<p id="message">Ready</p>

<form>
  <input type="hidden" name="layout" value="compact">
</form>
The page should display Ready. Use View Page Source, then search for Review note. You should find the comment even though it is absent from the rendered page. Next, open Inspect, select the paragraph, and change Ready to Changed locally. The visible page changes, but reopening source still shows Ready. Reloading restores the original page because you did not edit the saved file.
Find the hidden input in the inspector. Its name identifies the form field; its value is the data it would submit. Changing type to text makes it visible. Do not submit this practice form: it has no server handler.
Checkpoint: Explain why the comment, hidden input, and local text edit produce three different views of the same document. If the browser displays the markup as text, check the extension and that you used a plain-text editor.
View the original page source
Right-click the page and choose View Page Source, or use the browser's view source shortcut. This opens the HTML the server sent.
Search for:
POCKET{;- HTML comments beginning with
<!--; - form
action,method, andinputelements; hiddeninputs;- script filenames; and
- links or paths that are not visible on the rendered page.
Important: The Elements/Inspector panel shows the browser's current document. View Source shows the original response. Check both when a task says the browser received something it did not display.
Inspect or edit an element
- Open developer tools.
- Choose Elements or Inspector.
- Use the element-picker tool, then click the form or text you want to inspect.
- Double-click an attribute or value to edit it.
- Submit the form normally.
Edits affect only your browser's copy of the page. They are useful for testing whether the server trusts hidden or disabled form data.
See a complete request and response
- Open developer tools and select Network.
- Reload the page or perform one action.
- Select the new request.
- Check its URL, method, status, headers, query string or form data, and response body.
Enable Preserve log when a button moves you to a new page. Use Copy as cURL when you want a terminal command matching a browser request. Reproduce that baseline before removing headers: cookies, content type, and custom fields may matter. Keep copied session cookies out of shared notes.
Browser path: Clear the Network list, perform one action, then select the row whose URL matches the action. If many rows appear, filter by a distinctive part of the route; do not select an image or stylesheet accidentally. The request Headers section shows method and URL; Payload or Request shows submitted fields; Response Headers and Response show what came back. A form navigation may replace the page, which is why Preserve log matters.
Terminal path: Use curl -i as explained in Run and read a cURL command. A browser and cURL comparison is meaningful only if method, path, fields, and required cookies match. The browser normally sends cookies automatically; cURL does not.
Edit and resend a request in the browser
In Firefox Network, right-click the recorded request and choose Edit and Resend (the label may vary by browser version). Retain a baseline, change one method, header, or body field in the editor, and send it once. Select the new Network row to check what was actually sent and inspect the result. If your browser has no request editor, use Copy as cURL and the terminal path.
For a browser-only alternative, open the Console while on your assigned board's page. This synthetic template sends one GET on that same board; replace PATH only with a permitted route. It may create or update exercise session state. Enter code only after reading what it does. If browser paste protection blocks an example, use the request editor or terminal instead of disabling protection.
fetch('/PATH', {
  headers: {'X-Workshop-Mode': 'compact'}
}).then(async response => {
  console.log('status', response.status);
  console.log('body', await response.text());
}).catch(error => console.error('request failed', error));
fetch uses GET unless given a method, sends same-origin cookies by default, and does not reject its promise just because the server returns 403. Read the printed status and inspect the request in Network. The header here is an unrelated example; it is not a puzzle's required name or value. Do not try to set a Cookie header in browser JavaScript; the browser manages it.
For a permitted form submission, the corresponding structure is:
const fields = new URLSearchParams({label: 'blue & gold'});
fetch('/PATH', {method: 'POST', body: fields})
  .then(async r => console.log(r.status, await r.text()));
This changes server state if the route implements an update. URLSearchParams encodes the ampersand as part of the value and supplies form encoding. Compare this with Submit form data. Browser request editors and fetch cannot reproduce every possible raw HTTP request; use cURL when browser restrictions prevent the operation the module calls for.
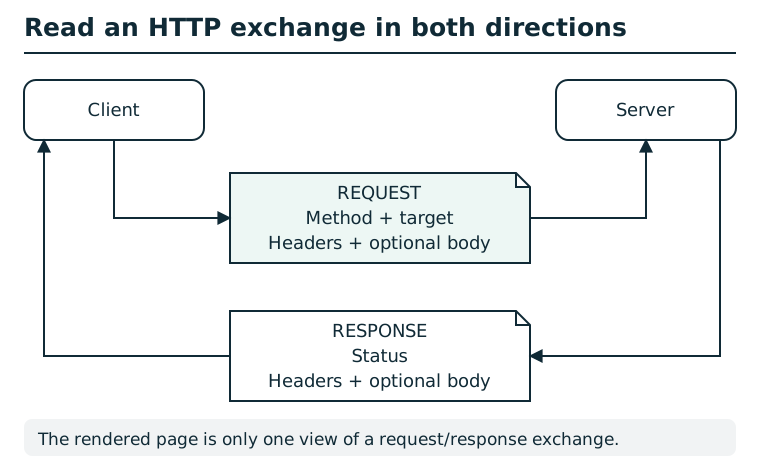
A request includes a method and target, headers, and sometimes a body. The response includes a status, headers, and sometimes a body. Inspect both directions: a browser's rendered page usually shows only the response body. Methods, cookies, authorization, and application state can affect the result; a status code alone is not a complete explanation. The diagram shows a generic exchange, not a station request.
Inspect and change a challenge cookie
- Open developer tools.
- Choose Storage or Application, then Cookies.
- Select the Pocket CTF address.
- Locate the cookie named by the module and inspect its value.
- If the task asks whether the browser controls that value, edit only that challenge cookie and reload.
Warning: Do not edit or delete pctf_session. It connects the browser to your progress on the board.
The cookie table may show Name, Value, Domain, Path, and expiry. Select the row with the module's challenge-cookie name; do not replace the whole table. Copy its original value to a private note, edit the value cell, press Enter, and reload the challenge. Then inspect the new request's Cookie header in Network to confirm what was actually sent. A value in storage is not proof that the request used it: domain and path determine where a cookie is sent.
If an edit has no effect, check for a second cookie with the same name but a different path, and inspect the response's Set-Cookie header to see whether the server replaced your value. Restore the original challenge value when done. Set-Cookie travels from server to browser; Cookie travels back in a request.
Change a URL safely
A URL may contain a path and a query string:
http://DEVICE_IP/some/path?name=VALUE&mode=VALUE- Change one path segment to test a nearby resource.
- Change one query value when the response names another supported value.
- Keep the rest of the URL unchanged so you know which change mattered.
- Preserve punctuation such as
?,&, and=.
Command-line HTTP recipes
These examples use synthetic paths and values. They do not contain a Pocket CTF solution.
Run and read a cURL command
Open a terminal and run curl --version; on Windows PowerShell use curl.exe to select the cURL executable rather than a shell alias. If it is unavailable, use the browser Network panel or the classroom's prepared HTTP client. Arrange tool installation before joining the board's offline network.
The shell examples use Bash-style quoting and \ to continue a line. In PowerShell, enter each command on one line with curl.exe; do not copy the Bash continuation backslashes. Quote a URL containing & so the shell does not treat it as a command separator.
curl -sS -i 'http://DEVICE_IP/PATH?format=text&limit=2'Replace the placeholders with a permitted route on your assigned board. -sS hides the progress meter but keeps connection errors; -i includes the response headers. A synthetic response might look like:
HTTP/1.0 200 OK
Content-Type: application/json
X-Workshop-Note: draft

{"ready":true}
Read from top to bottom: the status describes the result, headers describe the response, and the blank line ends the headers. Everything after it is the body. X-Workshop-Note is a response header, not a field to send back. In the browser, choose the matching Network row and compare Headers and Response; the Preview tab may transform the presentation.
| Observation | Meaning and next check |
|---|---|
| cURL connection error, no HTTP status | Check Wi-Fi, address, and port; the application has not answered. |
| 200 | Request handled; inspect the body to learn what it returned. |
| 204 | Successful response with no body; empty output can be expected. |
| 400 | Request format rejected; compare names, encoding, and required fields. |
| 403 | Operation denied; preserve the reason and your unchanged baseline. |
| 404 | Resource not found; recheck the route before changing your hypothesis. |
| 405 | Method not allowed; inspect Allow and the response body. |
HTTP errors usually do not make cURL itself report a connection failure. Read the HTTP status. Avoid -I when reproducing a GET: it sends HEAD, which may behave differently. Avoid following redirects automatically until you have recorded the original status and Location.
Read a page and its response headers
This sends one GET request to retrieve a page. Retrieval can still affect internal state: opening the home page can create a session and evict an older one, and some profile pages update hint state.
curl -i http://DEVICE_IP/PATHUse -sS when you want less progress output but still want errors:
curl -sS -i http://DEVICE_IP/PATHAsk which HTTP methods are supported
This asks the endpoint about its supported operations. Implementations differ; an absent or incomplete answer is not proof that no other method exists:
curl -i -X OPTIONS http://DEVICE_IP/PATHRead both the response body and the Allow header. A module may name the next method there.
Send a custom header
This sends a retrieval GET with one client-controlled header. The same session and hint-state caveats apply:
curl -i -H 'HEADER-NAME: VALUE' http://DEVICE_IP/PATHUse the exact header name and value provided by the module's evidence. Header names are case-insensitive; values may be case-sensitive.
Send a different method
Replace METHOD only with a method named by the exercise:
curl -i -X METHOD http://DEVICE_IP/PATHWarning: A non-GET method may change exercise state. Run it only against the assigned module and only after the module indicates that method.
Submit form data
This sends a state-changing request:
curl -i -X POST \
  --data-urlencode 'NAME=VALUE' \
  http://DEVICE_IP/PATH
For more than one field, repeat --data-urlencode. Copy field names from the HTML form, Network panel, or module response.
For practice, consider a form field label whose value is blue & gold. The argument --data-urlencode 'label=blue & gold' encodes the space and literal ampersand as value data. Writing label=blue & gold directly into a raw form body would make & a field separator. Supply ordinary text to --data-urlencode; supplying %26 when you mean & encodes the percent sign again. --data-urlencode selects POST by default; -X POST here is explicit.
To add one field, first capture the normal form submission in Network. Note the URL, method, content type, and each name/value pair in Payload or Request. Use Copy as cURL, reproduce that request, then add one --data-urlencode argument. Compare both complete responses. Changing several fields at once prevents you from identifying which change caused the result.
Keep the same Pocket CTF session
curl does not automatically share your browser's cookies. Prefer the browser for stateful scenario tracks. If an exercise specifically requires curl to use the same session, copy only your own pctf_session value:
curl -i --cookie 'pctf_session=YOUR_VALUE' \
  http://DEVICE_IP/PATH
Treat that value as private and delete it from shared notes.
Save a response without damaging the evidence
Download through the browser's link or save a response body to a new local filename. This GET writes local files and can create or update game session state as described above:
curl -sS -D response-headers.txt -o evidence-copy.bin \
  'http://DEVICE_IP/PATH'
-D saves headers separately; -o saves only the body. These options overwrite the named local files, so use a fresh exercise folder or new names. Read the saved status and Content-Type before processing the download. An HTML error page saved with a .png extension is still HTML. Do not redirect curl -i into a file you intend to hash: that would prepend HTTP headers to its bytes.
Checkpoint: You can locate the status, one response header, and body independently, and can explain why only the body belongs in a downloaded artifact.
Data and file recipes
Run a short Python script
Use a plain-text editor to save code as practice.py in your exercise folder. Open a terminal in that folder and run python3 practice.py. On a Windows installation with the Python launcher, use py practice.py. Do not copy the Markdown backticks or an interactive prompt such as >>> into the file.
text = "lamp"
raw = text.encode("utf-8")
print(repr(raw), len(raw), raw.hex())
Expected output: b'lamp' 4 6c616d70. Text is a sequence of characters; bytes is the exact sequence used by encoders, hashes, and network protocols. repr makes invisible characters visible: b'lamp\n' contains a newline and has length 5. .hex() prints two hexadecimal digits per byte.
If Python reports “can't open file,” check the working folder and filename. For SyntaxError, inspect the indicated line for copied smart quotes or missing punctuation. For IndentationError, keep indentation consistent with the example. ModuleNotFoundError names a missing library; these practice examples use Python's standard library and need no extra packages.
Base64
Browser path
Open developer tools → Console on the local practice HTML page. Enter each line separately so you can inspect its result:
atob('bGFtcA==')
btoa('lamp')
The results are lamp and bGFtcA==. atob decodes Base64 to a byte-valued string; btoa encodes that kind of string. These examples are ASCII. They do not make btoa a general Unicode encoder: characters outside its byte range can raise an error. For UTF-8 text use Python's explicit .encode('utf-8') and .decode('utf-8') path below. Keep challenge data local; an online decoder is unnecessary and would disclose what you paste.
Terminal path
Base64 commonly uses letters, digits, +, /, and optional = padding. Decode a value locally:
printf '%s' 'ENCODED_VALUE' | base64 --decodeEncode changed text:
printf '%s' 'TEXT_TO_ENCODE' | base64Base64 is an encoding, not encryption.
Try this: Run this locally to check the whole conversion chain:
import base64

raw = b"lamp"
encoded = base64.b64encode(raw)
print(encoded.decode("ascii"))
print(base64.b64decode(encoded, validate=True))
Expected output is bGFtcA==, then b'lamp'. The trailing == is encoding padding, not a signature. Copy only a JSON field's string value into a decoder, without its surrounding JSON quotes. Incorrect padding can mean a truncated copy or the wrong Base64 variant; establish which before appending characters. If decoded bytes are not text, print their .hex() instead of forcing UTF-8.
Use printf, not an ordinary echo, when exact bytes matter: echo commonly adds a newline. Preserve the original and compare a decode/re-encode round trip before changing a challenge value.
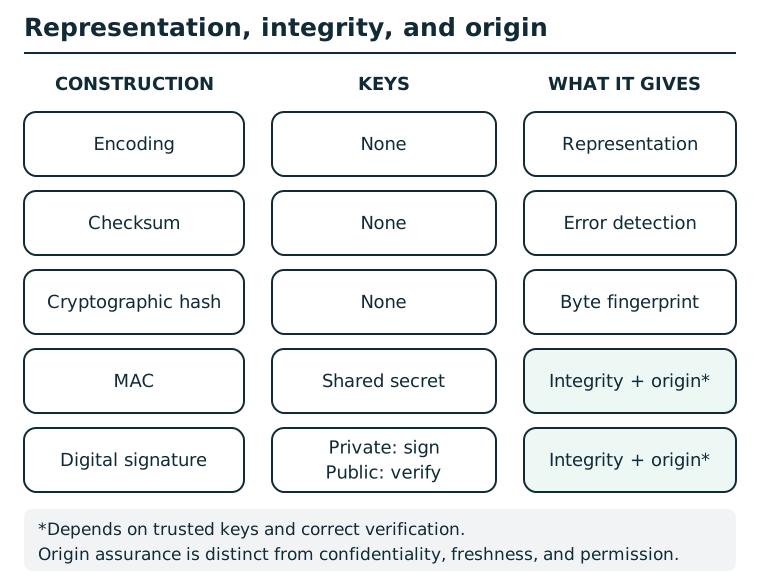
Encoding is reversible. Checksums detect accidental errors. Hashes fingerprint bytes but do not authenticate a source. A MAC provides integrity and origin within a group that shares a secret; any member can create tags. A signature binds bytes to a private-key holder when verification and public-key trust are correct. None of these alone encrypts, proves freshness, or grants authorization.
Hexadecimal
Browser path: On the local practice page's Console, the following decodes four byte pairs and then interprets those bytes as UTF-8 text:
const hex = '6c616d70';
const raw = Uint8Array.from(hex.match(/../g), h => parseInt(h, 16));
console.log(raw.length, new TextDecoder().decode(raw));
Expected: 4 lamp. This short demonstration assumes valid even-length hex. For unfamiliar input, validate the characters and length first or use Python's strict decoder below. An arbitrary ciphertext is bytes, not necessarily text.
Terminal path:
Hex text contains pairs of characters from 0-9 and a-f. Decode it:
printf '%s' 'HEX_VALUE' | xxd -r -pEncode text as hex:
printf '%s' 'TEXT_TO_ENCODE' | xxd -pPython provides a strict alternative when xxd is unavailable:
raw = bytes.fromhex("6c616d70")
print(raw, len(raw))       # b'lamp' 4
print(raw.hex())          # 6c616d70
The text "6c" has two characters; bytes.fromhex("6c") has one byte. Decode hex before XOR or block arithmetic. An odd number of hex digits cannot describe whole bytes. Python's decoder accepts spaces between byte pairs, but form fields may require uninterrupted hex. Do not include 0x unless the receiving tool explicitly supports it.
JSON and JSON Lines
Browser path: Open the module's JSON link. If the browser presents an expandable tree, expand the top-level object or array, then one record and its nested fields. Use the raw view or copy the text into an editor to preserve original values. Record the parent ID with each nested field. If no tree is available, practice in the Console on the local HTML page:
const data = JSON.parse('{"items":[{"id":"demo-a","zone":"north"}]}');
console.log(data.items[0].id, data.items[0].zone);
console.log(JSON.stringify(data, null, 2));
Expected first line: demo-a north; the second call produces indented JSON. JSON.parse reads data; it does not execute it as code. Do not paste a downloaded file as executable JavaScript. For small JSONL files, inspect one object per line or use the terminal path. JavaScript numbers cannot represent arbitrarily large integers exactly; use Python integers for the cryptographic transcripts.
Terminal path:
Pretty-print JSON:
jq . sample.jsonA JSON Lines file contains one complete JSON value per line. Values may be objects, arrays, strings, numbers, booleans, or null; these exercise logs use objects:
jq . telemetry.jsonlCompare IDs, sequence numbers, timestamps, actors, and repeated payloads. Do not assume file order is time order.
Try this: Save this unrelated data as practice.json:
{"items":[{"id":"demo-a","meta":{"zone":"north"}},
          {"id":"demo-b","meta":{"zone":"south"}}]}
Run these local, read-only commands:
jq . practice.json
jq '.items[0].meta.zone' practice.json
jq -r '.items[] | [.id, .meta.zone] | @tsv' practice.json
The first command indents the structure. The second prints "north": arrays start at index zero, and dots select fields inside objects. The third prints two tab-separated rows, demo-a north and demo-b south. [] visits each array item, | passes each item to the next operation, and -r prints strings without JSON quotes. Keeping the ID beside a nested value prevents you from attributing it to the wrong record.
Without jq, use Python on the same file:
import json
from pathlib import Path

data = json.loads(Path("practice.json").read_text())
for item in data["items"]:
    print(item["id"], item["meta"]["zone"])
For JSON Lines, read each nonempty line with json.loads(line) instead of loading the whole file as one value. A Python “Extra data” error often means you tried to load JSONL as a single JSON document. In jq, null can indicate a missing field; inspect the parent object and spelling before interpreting it as evidence. A parse error can mean you downloaded HTML instead of JSON.
File type and readable strings
file sample.bin
strings sample.bin
file identifies the likely format. strings finds readable text inside a file; search its output for labels such as TOKEN, KEY, USER, or PASSWORD.
Use a text editor's Find function or a local search command to retain context:
rg -n -i -C 2 'token|password|secret' downloaded-notes.txt-n displays line numbers, -i ignores letter case, and -C 2 includes two surrounding lines. The quoted pattern matches any of the three alternatives. For an exact identifier containing punctuation, use a literal search:
rg -n -F 'demo.device-8' downloaded-notes.txtNo matches is a search result, not proof that the file contains no credential. Try labels named by the artifact. A strings result does not preserve a binary file's full structure and can miss compressed, encoded, or short strings; use a format-aware tool for metadata. In the supplied firmware-text exercise, open the text export directly rather than trying to execute it as firmware.
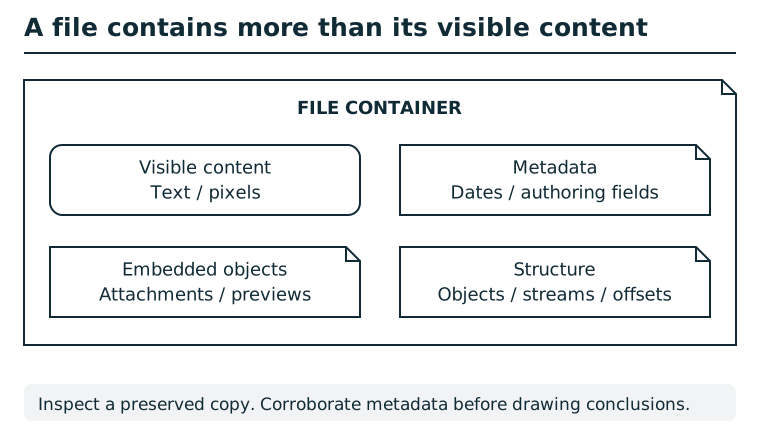
A file container can hold visible text or pixels, metadata, embedded objects, and structural information. A rendered view exposes only part of that content. Compare appropriate views of a preserved copy and record where each observation came from. Metadata may be stale or edited; corroborate it before attributing an action or identity.
Image metadata
Graphical path: Open a downloaded copy in a metadata-aware image viewer. Look for Metadata, EXIF, or Image information, expand GPS or textual metadata groups, and record field/value pairs. A generic file manager may show only filesystem properties. If the viewer displays no embedded metadata, compare with ExifTool or the supplied PNG tool before concluding it is absent.
Terminal path:
exiftool image.jpgLook for GPS coordinates, software, author, description, comment, and device fields. If the module supplies an offline evidence tool, that tool is the preferred alternative.
Read the output: A metadata tool typically prints Field name : value. Record both. Here is synthetic output for interpreting location:
GPS Latitude  : 12 deg 30' 0.00" S
GPS Longitude : 34 deg 15' 0.00" E
Software      : Example Exporter
Convert degrees/minutes/seconds with degrees + minutes/60 + seconds/3600. South and west are negative, so this pair is -12.5,34.25 in latitude-longitude order. A software field is a claim stored in the file, not proof of ownership.
To reduce a long listing, these read-only ExifTool options show metadata groups, duplicate tag names, or numeric coordinate values:
exiftool -G1 -a image.jpg
exiftool -n -GPSLatitude -GPSLongitude image.jpg
If coordinates are absent, inspect the full listing before concluding there is no location data; fields differ by format. Do not add assignments such as -TAG=VALUE while inspecting evidence: those write metadata.
For a PNG module with the supplied notes tool, download both files and run:
python3 png-notes.py portrait.pngExpected output is one textual key=value entry per supported text chunk. Record the key beside its value. This supplied tool is a narrow PNG text-chunk reader, not a substitute for inspecting every possible PNG metadata format.
PDF metadata and attachments
Graphical path: Open the downloaded PDF in a desktop reader. Use File → Properties or Document Properties for Author/Creator/Producer. For embedded files, open Attachments (often a paperclip panel), record its list, and save the selected attachment into a new exercise folder. Choose Save rather than launching the attachment; open an extracted email in a text editor. Browser PDF viewers vary and may omit attachments or detailed properties. If either panel is unavailable, use the terminal path or a prepared text export.
Terminal path:
pdfinfo document.pdf
exiftool document.pdf
pdfdetach -list document.pdf
To extract listed attachments into the current directory:
pdfdetach -saveall document.pdfThis writes files locally but does not change the PDF. Work in a folder created for the exercise so extracted files do not overwrite other work.
Read the output: pdfinfo may show Author, Creator, and Producer. Author describes attributed authorship; Creator describes the source application; Producer describes the PDF-generating software. A generic office application is weaker organizational evidence than a specialized producer string. These fields can be edited, so retain their attribution limits.
A synthetic pdfdetach -list result might be:
2 embedded files
1: release-note.txt
2: review-message.eml
Extract just the selected file to a new local name:
pdfdetach -save 2 -o extracted-message.eml document.pdfThe number is the PDF attachment index, not a page number. Open the extracted .eml in a text editor. Its header block ends at the first blank line; From and To describe sender and recipient, while Message-ID and In-Reply-To describe message relationships. A continuation line belongs to the preceding header. Distinguish an attachment inside the message from the message's own position in the PDF attachment list. A file merely mentioned in email text is not necessarily embedded; state which evidence supports the count.
If pdfinfo works but the browser's attachment panel is missing, use pdfdetach; the tool operations answer different questions. “0 embedded files” does not rule out sensitive text or metadata elsewhere in the PDF.
SHA-256
Graphical path: In a checksum utility, select the downloaded file, choose SHA-256, and calculate. Record the full digest and filename; if it offers a comparison box, paste the expected manifest digest there. A progress bar finishing only proves the calculation finished. A match requires comparison with the correct manifest row. If your graphical tool cannot choose SHA-256, use one of the terminal options below.
Terminal path:
sha256sum FILECompare the entire digest with the matching line in the manifest. A matching hash supports byte-for-byte integrity. It does not prove who published or authorized the file.
Try this: Create two local practice files and compare exact bytes:
import hashlib
from pathlib import Path

for name, raw in [("sample-a.txt", b"lamp"),
                  ("sample-b.txt", b"lamp\n")]:
    Path(name).write_bytes(raw)
    print(name, len(raw), hashlib.sha256(raw).hexdigest())
This writes two practice files; run it in a fresh folder. Each digest has 64 hex digits, but the digests differ because the second file has a newline. Run sha256sum sample-a.txt sample-b.txt and compare it with Python's results. On macOS, shasum -a 256 is an alternative; on PowerShell use Get-FileHash -Algorithm SHA256 sample-a.txt.
For a download, Python's Path("filename").read_bytes() gives the bytes to hash; do not use read_text().strip() because that changes the evidence. Pair each filename with its expected digest and calculated digest. If every row mismatches, first check that you saved file bodies, not HTML pages or copied text. Differences in uppercase versus lowercase hex do not change a digest; differences in the underlying file do.
Small local searches with Python
Some modules give you a small, explicitly bounded keyspace. Search it locally instead of sending hundreds of requests to the board:
import hashlib

target = "COPY_THE_MODULE_HASH"
for number in range(1000):
    candidate = f"{number:03d}"
    digest = hashlib.sha256(candidate.encode()).hexdigest()
    if digest == target:
        print(candidate)
        break
This script performs local calculations only. Send the recovered candidate to the board once.
Time zones and offsets
Worksheet path: Make columns for event ID, local date/time, signed offset, and UTC date/time. Convert each row before sorting. A spreadsheet can help, but keep an untouched original column and sort the whole table so the IDs do not detach from their events. Check one row manually: spreadsheet time-zone parsing depends on the program and input format.
Python path: Use the explicit-offset example below to verify the same conversion locally.
A timestamp ending in Z is already UTC. For an offset timestamp:
- subtract a positive offset to reach UTC;
- add the size of a negative offset to reach UTC; and
- check whether the conversion crosses midnight.
Write every event in UTC, then sort by the converted time.
Try this: 2031-05-07T00:20:00+02:00 becomes 2031-05-06T22:20:00+00:00: subtract two hours and retain the previous date. 2031-05-06T19:50:00-03:00 becomes 2031-05-06T22:50:00+00:00. The first event happened 30 minutes earlier, despite its later local date. Check the arithmetic locally:
from datetime import datetime, timezone

samples = ["2031-05-07T00:20:00+02:00",
           "2031-05-06T19:50:00-03:00"]
for value in samples:
    utc = datetime.fromisoformat(value).astimezone(timezone.utc)
    print(value, "->", utc.isoformat())
Keep the event ID beside both timestamps in your real table. This conversion handles explicit offsets; it does not discover a missing time zone or correct an inaccurate clock.
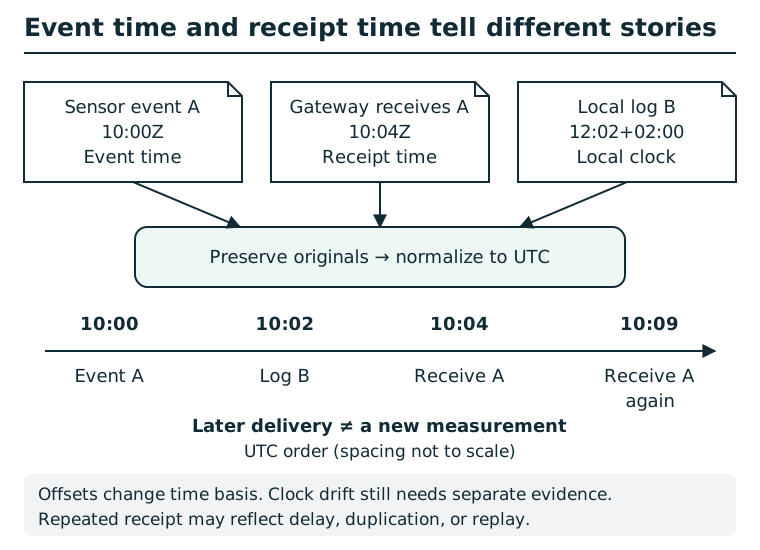
Keep event time, receipt time, source identifier, time-zone offset, and any known clock error in separate columns. In this synthetic example, the sensor's 10:00Z event is received at 10:04Z; a local log at 12:02+02:00 corresponds to 10:02Z. A second receipt of the same event at 10:09Z is not proof of a new event. Time-zone conversion does not correct clock drift; preserve uncertainty and corroborate replay before concluding it.
Module map
Each module page contains its own investigation prompts and progressive hints. Start with the task, reveal one hint only when needed, and record what the response proves before moving on.
Module guides
Choose your track: Core, Lattice Trail, River Station, or The Glass Witness.
Scenario-track tool guide
Scenario modules ask for evidence-backed findings before revealing a seal. Use the module guide for the artifact set and submission format.
Lattice Trail
The Byline Photo
Open the module guide for image metadata.
The Pitch PDF
Open the module guide for PDF provenance.
Working Notes
Open the module guide for combined identifiers.
The Lawsuit Filing
Open the module guide for redaction layers.
The Portfolio Page
Open the module guide for third-party requests.
The Weekend Posts
Open the module guide for cross-artifact correlation.
River Station 14
Maintenance Window
Open the module guide for log and policy comparison.
Calibration Package
Open the module guide for integrity and publisher trust.
Service Credential
Open the module guide for embedded shared secrets.
Echo in the Rain
Open the module guide for event and receipt times.
Trusted Gateway
Open the module guide for proxy boundaries.
Safety Decision
Open the module guide for the incident-response capstone.
Read the operations note, then assess three claims against the linked records. For each claim, select a verdict and a specific evidence observation. Choose one control addressing acceptance of repeated telemetry as fresh. All seven choices are required; no event-ID sequence or exact prose answer is requested.
Use an evidence table: claim, observed fields, conclusion, and remaining uncertainty. Explain why the selected control addresses the stated failure and what it leaves unresolved. The board checks structured decisions; discuss your reasoning with the instructor. Rejected forms retain recognized selections and give targeted feedback. An accepted finding reveals a seal to file on the incident board; repeating accepted decisions retrieves it within that session.
The Glass Witness
The Covered Name
Open the module guide for incomplete redaction.
Portrait of Static
Open the module guide for PNG metadata.
Hairline Fracture
Open the module guide for manifest comparison.
Four Rooms, Four Clocks
Open the module guide for time normalization.
The Memory Next Door
Open the module guide for bounded object access.
Consent in the Wrong Order
Open the module guide for sequence integrity.
Core — Insane
These modules expect short local scripts. Run requests sequentially and keep intermediate artifacts when a module says the next stage needs them.
1. Split Decision
Open the module guide for parser disagreement.
2. False Identity
Open the module guide for token verifier policy.
3. Quiet Oracle
Open the module guide for CBC error feedback.
4. Final Authority
Open the module guide for unsafe prefix hashes.
5. Nonce Encore
Open the module guide for repeated signature nonces.
6. Chained Forgery
Open the module guide for variable-length CBC-MAC.
Flags, hints, and progress
When a page reveals a flag or seal:
- copy the complete
POCKET{...}value; - return to the profile or track home page;
- paste it into the flag/seal form; and
- keep the success page or progress count visible before continuing.
In The Glass Witness, record each pane's key finding before filing its witness seal in the same browser session. If you lose the seal response, revisit the pane or repeat the accepted finding to retrieve it; this does not add progress twice. Six key findings and six filed seals unlock all three ending choices. Supporting findings are optional and strengthen the final account.
In Lattice Trail, reopen the station or repeat an accepted finding to retrieve its earned seal in the same browser session. Already recorded means the finding is saved and no extra progress was added. File the seal on the track index before closing the review; closure prevents further findings and filing.
Only incorrect flags consume attempts. An unearned seal or a closed review does not. After 25 incorrect flag submissions, further flag submissions are blocked for the current session; other pages remain available. Check braces, capitalization, and the per-boot suffix instead of repeatedly guessing. Ask the instructor before a board restart, which clears everyone's progress.
In-game progressive hints are session-specific. Reveal one, try it, then return for the next only if needed. Restarting the board clears all sessions, hints, progress, and per-boot completion tokens.
Quick troubleshooting
- Page does not open: Recheck Wi-Fi and use
http://192.168.4.1/, not HTTPS. - A command works in the browser but not cURL: The request may need your current session cookie.
- Form data is rejected: Check the exact field names and URL encoding in the Network panel.
- Custom header seems ignored: Quote the complete
Name: valueargument after-H; check the value and current session. cURL accepts options before or after a URL; putting options first is just our consistent example style. - Base64 will not decode: Remove surrounding quotes or JSON punctuation and restore required padding.
- Hex will not decode: Confirm there are two hex characters per byte and no prefix or spaces.
- Hash never matches: Hash the downloaded file bytes, not copied visible text or a filename.
- Progress disappeared: Return to the original browser profile; do not create more sessions.
- Board is slow: Stop scripts and repeated requests, wait, then reload once.
For basic connection recovery, use the connection guide.